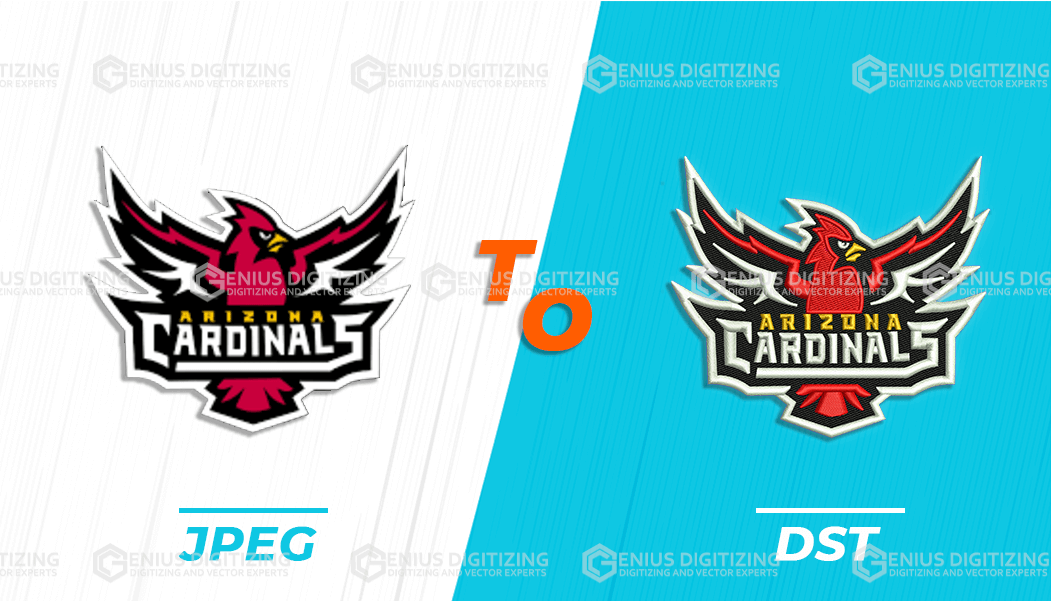
JPG Image or Logo to Embroidery File Format Free – The Ultimate Guide
We all know someone who believes that machine embroidery is a simple process – you just upload the logo, and the machine will make the design. But hey, we are here to burst the bubble because if you want to convert a JPG image or logo into an embroidery design, it’s going to be a challenging process. With this article, we are sharing the complete guide with you!
JPG – What Is It?
These are the most image file formats with a pixel configuration. When you transfer the images from a smartphone to a computer, it is highly likely to be in JPG format. This format is great and widely used because they have compression, which means the quality will be higher even with a small size. In addition, they are compatible with web browsers.
Embroidery File – What Is It?
There are different types of embroidery files, ranging from vector-based graphics to pixel-based graphics. The embroidery file needs to have various pieces of information to ensure the embroidery machine can complete the embroidering job. Some of this information includes different colors, stitching types, stitch density, angle, and order. There are different formats of embroidery files, but you can easily convert the JPG into an embroidery file.
Logo Digitization
When it comes down to JPG image or logo to embroidery file format, it falls under the category of logo digitization. It is important because the embroidery machines aren’t designed to read similar files as the computer can. For this reason, it’s important to digitize the logo, so the embroidery machine can comprehend it to start embroidering. However, since there are different embroidery file formats, the embroidery machines can only support specific formats, and we are sharing the information;
- Brother embroidery machines work with .kwk
- Happy embroidery machines work with .tap
- Tajima embroidery machines work with .dst
- Janome embroidery machines work with .jef
Converting JPG Image To Embroidery File Format
Now that we have shared information about both types of files, we can start with the conversion process. However, keep in mind that you will need the digitizing software for transforming the formats. In the section below, let’s check out the instructions;
1. Uploading The Logo
First of all, you have to upload the JPG image or logo on the software that you’ve selected. Make sure that you’ve cropped out the unwanted area (the blank space) to make sure nothing extra gets embroidered.
2. Setting The Design Size
When you have uploaded the cropped logo, add the desired size and dimensions. Keep in mind that what dimensions you put in will be the size of embroidery, so take your time in drawing out the dimensions. Once you choose the desired sizes, lock the logo.
3. Select The Stitch Type
There are various stitch types available with different textures and appearances. In addition, every stitch type has a maximum length of stitches which must be considered. While choosing between the stitch types, consider the fabric’s push and pull and type. In the section below, we are sharing information about three common types of stitches, such as;
Straight stitch – this is the foundational stitch where straight lines are used repeatedly to create a pattern. The users can make thicker lines by repeating the stitches. It can be used for curved shapes and is suitable for detail work, outlining, and shading
Satin stitch – this is a reasonable option if you want to make text embroidery. It has a longer length which results in a shiny appearance, and the length goes up to 12.1mm. The satin stitch works for borders, texts, words, and for embroidery that needs to look shiny
Full stitch – this is known as ceding stitch and tatami stitch and is used for filling purposes. It tends to provide a woven appearance, and the length goes up to 4mm. It is suitable for creating the textured
appearance, filling in the design, and for bigger designs
4. Setting The Directions
When you have selected the desired stitch type, you need to set the direction for outlining the map for embroidery machines. In simpler words, it helps provide sequenced instructions for the stitching. Keep in mind that stitch patterns will have different shades, contours, and textures depending on the stitch, so think carefully. Also, setting the directions will ensure an even pattern, less thread consumption, and a time-efficient process.
5. Setting The Thread Colors
The software will show the color bar, and you need to choose the thread color for embroidery. It is important that you match the thread colors to the Pantone colors of the logo.
6. Transferring Files To Embroidery Machines
When you have selected all the features and designs, you can transfer the new embroidery file format to the embroidery machine. It depends on how you are using the software, so you can choose between a flashcard and USB cable for transferring the files.
If you only want to convert the JPG logo into the embroidery format, this is the last step because the new format is transferred to the embroidery software. In the next step, you only need to prepare the machines for transforming the embroidery file format to real-time embroidering on the fabric.