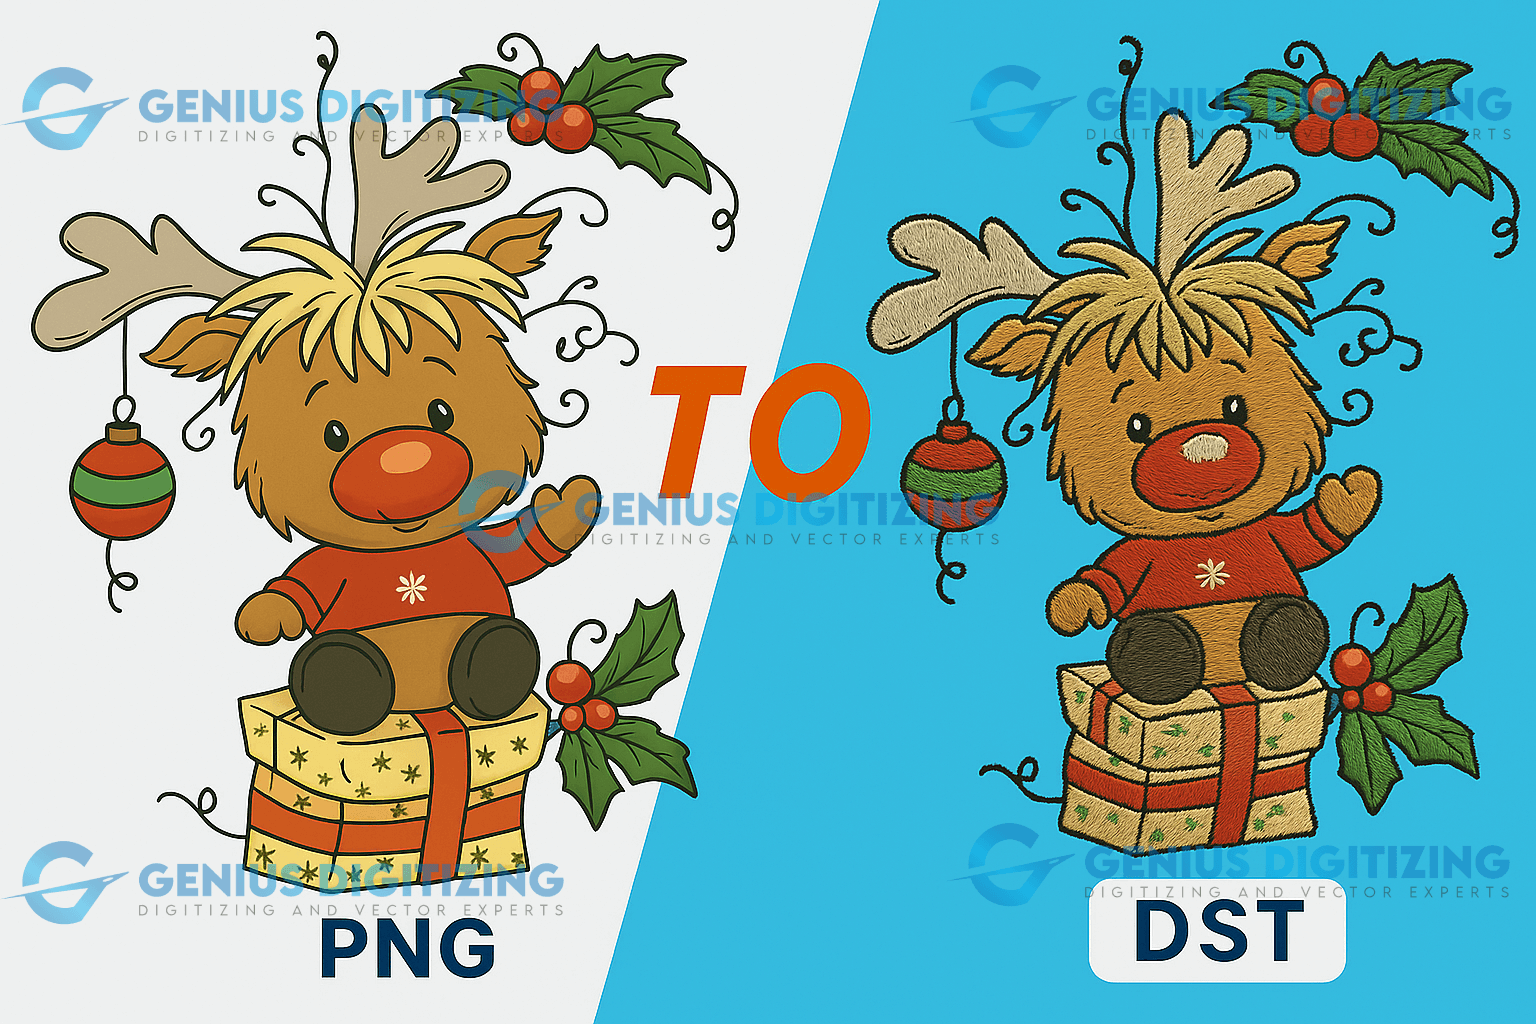
How to Convert PNG to DST—Step By Step Guide 2025
Converting an image to a DST file is not as easy as merely changing the format. In this tutorial, we will discuss some of the ways to create DST files for embroidery, such as converting PNG, JPG/JPEG, and PDF to DST files for embroidery machines. Before we go deeper, you can read about embroidery file formats.
What is a DST File?
DST is an image format used by embroidery machines to create designs on items like T-shirts, jackets, and hats. Before transferring, an image must be digitized and saved as a DST file. If you have a PNG file, a common image format, it needs to be converted to DST for the embroidery machine to read and properly transfer it onto the garment.
What is a PNG File?
The PNG (Portable Network Graphics) format is a raster-graphics file commonly used on websites to display high-quality digital images. Designed to outperform GIF files, PNGs provide lossless compression and a much wider, more vibrant color range.
What is a JPG/JPEG File?
JPG and JPEG are technically different image formats, but they are used in the same way, so they are often discussed together. The only difference between the two is the number of characters. JPEG stands for Joint Photographic Experts Group, the subcommittee that created the JPEG standard, along with other still picture coding standards under the broader ISO group.
What is a PDF File?
Portable Document Format (PDF), standardized as ISO 32000, is a file format developed by Adobe in 1992. It is used to present documents, including text formatting and images, independently of application software, hardware, and operating systems.
Converting a PNG file to a DST file is essential for embroidery machines to read and transfer the design onto fabric. However, it’s not as simple as just changing the file format. You need to digitize the image to make it compatible with embroidery software.
Here’s a step-by-step guide to help you convert a PNG file to DST for embroidery:
Step 1: Prepare Your PNG Image
Before converting, make sure your PNG image is high-quality and clear. Embroidery designs require clean lines and defined edges. You may need to adjust the image for size and resolution to ensure the best result during the conversion.
Step 2: Use Embroidery Digitizing Software
To convert PNG to DST, you'll need embroidery digitizing software. These programs allow you to transform raster images (like PNG) into vector-based designs suitable for embroidery machines. Some popular embroidery digitizing software includes:
-
Wilcom Embroidery Studio
-
CorelDRAW with the Wilcom plugin
-
Adobe Illustrator (with plug-ins for embroidery)
-
Embird
-
TruEmbroidery
Step 3: Import the PNG File into the Software
Once you have your digitizing software, import your PNG file. Most software allows you to open PNG files directly. After importing, you may need to adjust the settings to ensure the software recognizes the image properly.
Step 4: Digitize the Image
Now comes the digitizing process. This is where the software converts the image into embroidery instructions that the machine can understand. You’ll have to manually trace the design, set stitch types, directions, and adjust the size as needed. Some software offers automatic tracing, but manual adjustment is often necessary to ensure the best outcome.
Step 5: Save as DST
After completing the embroidery digitizing process, save the file in the DST format. This is the file format used by most embroidery machines, especially for machines made by brands like Tajima. The software will generate the DST file, which includes all the necessary embroidery instructions.
Step 6: Test the Design
Before starting the actual embroidery, it's a good idea to test the design on a sample fabric to ensure that the conversion is successful. Check for any stitching issues or irregularities that might need adjusting.
Step 7: Transfer the DST File to the Embroidery Machine
Finally, transfer the DST file to your embroidery machine. This is typically done via USB, direct connection, or wirelessly, depending on your machine. Once transferred, you can begin stitching your design on fabric.
Conclusion
Converting PNG to DST is a crucial step for transferring designs onto fabric with embroidery machines. While the process involves using embroidery digitizing software to trace, adjust, and save the image in DST format, it ensures high-quality results. By following the proper steps and testing the design, you can easily convert PNG images to DST files for embroidery.